
Understanding the Time, Skill, and Patience Behind Ajrakh Block Printing
Ajrakh may look like a beautifully patterned piece of fabric, but behind every finished saree is a surprisingly long journey. The deep indigo, earthy red, sharp geometric borders, floral motifs, and carefully repeated patterns are not created in a single printing session. They are built slowly through washing, treating, printing, resisting, dyeing, drying, washing again, and repeating several stages.
This is why an authentic handmade Ajrakh saree can take around three weeks or even longer, depending on the design, fabric, weather, dyeing method, number of colors, and artisan’s process.
The easiest way to understand this traditional craft is to follow its chronology.
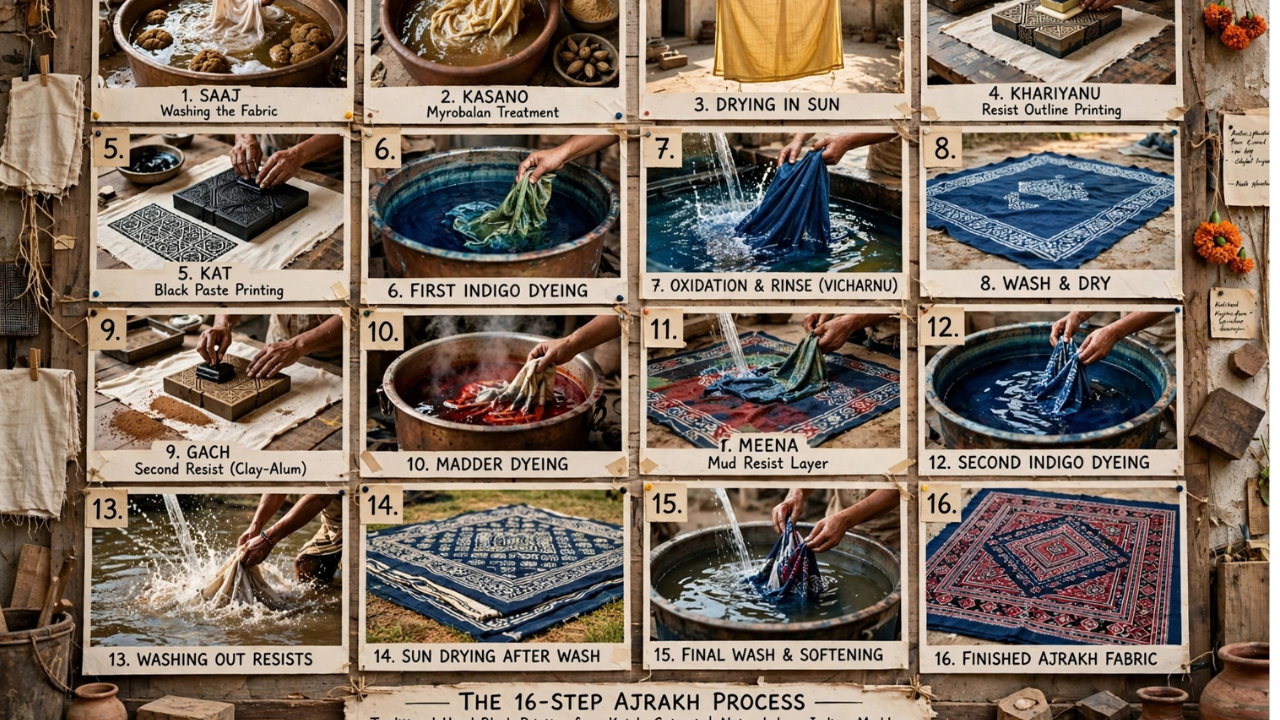
Instead of looking at Ajrakh as simply “block printing,” we can look at it as a 16-step journey, with some detailed traditions and workshops breaking the process into 21 or more individual stages.
The numbers may differ because some artisans combine related activities into one stage while others document every preparation, printing, dyeing, washing, and finishing activity separately.
What remains consistent is the principle:
Ajrakh is built layer by layer, and every layer needs time.
Ajrakh Block Printing at a Glance
Before going into the detailed chronology, here is the entire process in simple terms.
The traditional Ajrakh journey broadly includes:
- Fabric selection and preparation.
- Initial washing.
- Treatment with natural materials.
- Drying and preparing the fabric for printing.
- Preparation of natural dyes and printing pastes.
- Preparation of wooden blocks.
- First printing.
- Resist application.
- Dyeing.
- Washing.
- Drying.
- Additional printing.
- Additional resist work.
- Repeated dyeing.
- Final washing.
- Finishing and inspection.
These stages may be described differently by different artisans and institutions.
Some detailed descriptions divide the work into 16 major steps, while others identify 21 individual stages by separating preparation, printing, dyeing and washing activities.
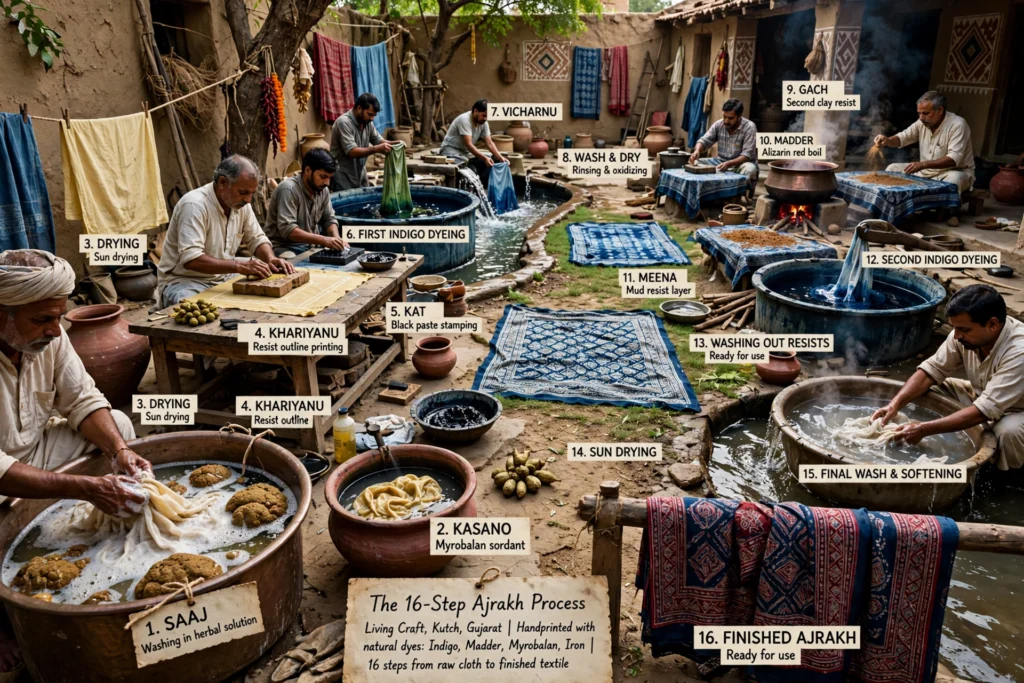
The difference is mainly in how the chronology is counted, not in the fundamental craft.
The Chronology of Printing: From Plain Cloth to Ajrakh Saree
Step 1: Choosing the Right Fabric
The Ajrakh process begins before the first block touches the fabric.
The artisan must select a suitable base fabric.
This decision involves:
- Fabric quality.
- Fiber composition.
- Weave.
- Thickness.
- Intended use.
- Ability to absorb dyes.
- Final product requirements.
Cotton is strongly associated with traditional Ajrakh production, although contemporary artisans may experiment with different fabrics.
A good fabric must be able to withstand repeated washing, dyeing and drying.
This is important because Ajrakh is not normally a simple one-print process.
The fabric has to survive a demanding journey.
Step 2: Washing and Preparing the Cloth
The newly selected fabric is not immediately ready for printing.
It first needs to be cleaned and prepared.
This stage helps to:
- Remove dirt.
- Remove excess substances from processing.
- Improve absorbency.
- Prepare the fibers for natural dyes.
- Create a more consistent printing surface.
Traditional textile preparation is one of the reasons Ajrakh requires patience.
The artisan cannot simply rush from raw cloth to finished design.
The foundation has to be prepared first.
If the fabric is not properly prepared, later colors and prints may not develop as expected.
Step 3: Treating the Fabric
One of the distinctive features of traditional Ajrakh is the use of natural materials during fabric preparation.
A traditional process can involve hard or myrobalan, which helps prepare the fabric for subsequent stages.
At this stage, the artisan is essentially preparing the cloth to receive:
- Printing pastes.
- Resist materials.
- Natural dyes.
- Multiple color layers.
This is one of the hidden reasons why Ajrakh looks different from ordinary commercial printed fabric.
The final appearance depends not only on the design but also on everything that happened to the cloth before the design was printed.
Step 4: Drying the Prepared Fabric
After washing and treatment, the fabric needs to dry.
This sounds like a small step, but it can influence the entire production schedule.
Drying depends on:
- Weather.
- Humidity.
- Sunlight.
- Fabric thickness.
- Workshop conditions.
- Season.
Traditional textile production is closely connected to the environment.
A rainy or humid period can affect drying time.
Strong sunlight may speed up drying, but the artisan still has to ensure the fabric is appropriately prepared for the next stage.
This is one reason handmade textile production cannot always be measured like factory production.
Step 5: Preparing the Wooden Blocks
Now the visual identity of Ajrakh begins to appear.
Ajrakh printing uses carved wooden blocks.
Each block can represent a particular part of the design.
Blocks may be created for:
- Main motifs.
- Borders.
- Floral elements.
- Geometric forms.
- Dots.
- Repeated patterns.
- Resist areas.
Block carving requires considerable precision.
The design has to be transferred correctly onto the wood and carved so that the raised surface can transfer the printing material accurately.
A tiny error in the block can affect repeated motifs across an entire length of fabric.
Step 6: Preparing the Printing and Resist Materials
The artisan now prepares the materials needed for printing.
Different stages can require different pastes, mordants, dyes and resist materials.
Traditional Ajrakh may involve:
- Natural dye materials.
- Resist pastes.
- Mordants.
- Clay-based materials.
- Plant-based materials.
- Gum or other binding ingredients.
The exact recipes can vary according to the artisan, region, design and desired color.
This is also where the craft becomes highly technical.
The artisan needs to understand how different materials behave when they meet the fabric, water, heat, air and dyes.
Step 7: The First Block Printing
The first major printing stage begins.
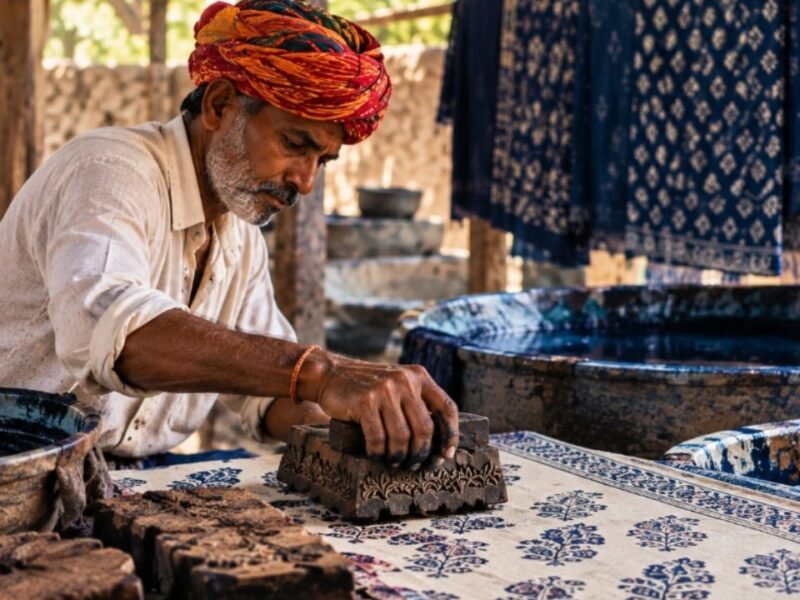
The artisan places the prepared fabric on the printing surface and carefully applies the wooden block.
The block has to be positioned accurately.
Then it is pressed onto the fabric.
The process is repeated across the textile.
The artisan must control:
- Pressure.
- Position.
- Alignment.
- Amount of printing material.
- Distance between motifs.
- Repetition.
- Fabric movement.
This is where handmade Ajrakh differs from a digitally printed textile.
There is no automatic machine correcting the artisan’s alignment.
The human hand is responsible for keeping the pattern visually consistent.
Step 8: Creating the Resist Layer
Resist printing is central to the Ajrakh process.
A resist material is applied to selected areas so that those areas react differently during the subsequent dyeing stage.
In simple terms:
The artisan decides where the color should not penetrate or develop in the same way.
This creates the contrast that eventually forms part of Ajrakh’s distinctive pattern.
Resist work requires planning because the artisan is effectively working several stages ahead.
They have to imagine what the fabric will look like after dyeing, washing and further printing.
Step 9: The First Dyeing Stage
The fabric now enters the dyeing process.
Depending on the design and color sequence, different natural dyes can be introduced.
Indigo is particularly associated with Ajrakh’s deep blue visual identity.
Other traditional color systems can create reds, blacks, earthy shades and additional tones.
The dyeing stage requires attention to:
- Dye preparation.
- Fabric immersion.
- Timing.
- Oxidation.
- Temperature and environmental conditions.
- Desired color intensity.
Natural dyeing is not always about pressing a button and selecting a color.
The artisan works with a living material system.
The color develops through chemistry, time and repeated handling.
Step 10: Washing the Fabric
After dyeing, the textile is washed.
This stage helps remove excess materials and reveals changes in the printed and dyed areas.
Washing can dramatically change the appearance of the fabric.
The cloth that comes out of a dyeing stage may not look exactly like the final textile.
Washing helps to:
- Remove unwanted dye.
- Reveal resist areas.
- Clean the fabric.
- Develop contrast.
- Prepare the textile for subsequent stages.
This is another reason Ajrakh cannot be completed in one afternoon.
Each layer has to be processed before the next one can be added.
Step 11: Drying Again
After washing, the fabric is dried again.
This cycle can happen multiple times.
The basic rhythm becomes:
Print → Resist → Dye → Wash → Dry → Repeat
That repeated cycle is one of the biggest reasons behind the long production period.
The artisan cannot always move immediately to the next stage.
The cloth needs time.
The workshop environment matters.
The weather matters.
The dye matters.
The fabric matters.
And the artisan has to judge when the textile is ready for the next operation.
Step 12: Second Printing and Additional Motifs
Once the earlier layer has been processed, the artisan can introduce additional printed elements.
This is where the design starts becoming more complex.
Additional printing can build:
- Borders.
- Central motifs.
- Floral patterns.
- Geometric details.
- Small decorative elements.
- Contrast areas.
The artisan must align each new block with the existing design.
This requires remarkable visual discipline.
A repeated pattern may stretch across several meters, so even a small alignment mistake can become visible.
Step 13: Additional Resist Work
More resist may now be applied.
This allows the artisan to protect certain areas before another dyeing stage.
This repeated use of resist and dye is one of the reasons Ajrakh designs can have such depth.
Instead of creating the entire pattern in one color application, the design develops gradually.
Think of it like layers in a painting:
- One layer establishes the foundation.
- Another creates contrast.
- Another introduces color.
- Another defines the motif.
- Another sharpens the border.
But unlike a modern printed image, these layers are physically built into a textile through repeated craft processes.
Step 14: Repeated Dyeing and Color Development
The textile may go through additional dyeing stages depending on the intended design.
This is where the final color relationships begin to emerge.
Deep blue may sit beside earthy red.
Black may define a geometric form.
White or undyed areas can create contrast.
The final effect is the result of several carefully planned stages rather than one application of color.
This stage explains why Ajrakh has visual depth.
The textile is not merely colored.
It is constructed through color.
Step 15: Final Washing and Finishing
After the printing and dyeing stages are complete, the fabric undergoes final washing.
This removes remaining processing materials and helps reveal the finished appearance.
The textile may then be:
- Washed thoroughly.
- Dried.
- Checked.
- Smoothed.
- Finished.
- Folded or prepared for stitching.
At this point, the artisan can finally see the complete relationship between the colors, motifs and borders.
The final textile may look effortless.
But it represents weeks of work.
Step 16: Inspection and the Final Ajrakh Saree
The last stage is not simply “the saree is ready.”
The artisan still needs to inspect the textile.
The finished fabric is checked for:
- Pattern alignment.
- Color development.
- Printing quality.
- Fabric damage.
- Uneven areas.
- Border consistency.
- Overall appearance.
Only after this inspection can the textile move toward its final use.
If it becomes a saree, additional processes such as cutting, finishing, stitching or edging may also be involved depending on the product.
This means the 16-step printing chronology describes the core textile-making journey, not necessarily every operation involved in producing a retail-ready saree.
Why Does It Take Nearly 3 Weeks to Make One Ajrakh Saree?
This is the question that makes the entire process easier to understand.
The answer is simple:
Because Ajrakh is a layered process, not a single printing operation.
The time is consumed by:
- Fabric preparation.
- Washing.
- Natural treatment.
- Drying.
- Block preparation.
- Resist printing.
- Dye preparation.
- Dyeing.
- Washing again.
- Drying again.
- Repeated printing.
- Repeated resist application.
- Multiple color stages.
- Final washing.
- Finishing.
- Quality checking.
The exact production time is not fixed.
One saree may take around three weeks, while another may require more or less time.
Factors affecting the timeline include:
- Number of colors.
- Complexity of the design.
- Number of printing blocks.
- Type of fabric.
- Natural dye process.
- Weather.
- Drying conditions.
- Artisan’s workflow.
- Size of the textile.
- Number of repeated layers.
Therefore, saying “three weeks” should be understood as an approximate production time frame rather than a universal rule for every Ajrakh saree.
16 Steps vs. 21 Steps: Why Are There Different Numbers?
People researching Ajrakh may come across different descriptions of the process.
One source may describe 16 steps.
Another may describe 21 steps.
This does not necessarily mean that one description is wrong.
The difference often comes from the way the process is divided.
A 16-step framework may group:
- Preparation stages together.
- Related printing stages together.
- Dyeing stages together.
- Washing and drying cycles together.
A 21-step framework may separate:
- Fabric washing.
- Fabric treatment.
- Drying.
- Mordant preparation.
- First printing.
- Resist application.
- Individual dye baths.
- Washing after each dye stage.
- Repeated printing.
- Final finishing.
In other words:
16 steps can describe the major stages, while 21 steps can provide a more granular chronology.
The actual craft may contain even more individual actions when every preparation and handling stage is documented.
The 21-Step Detailed Chronology
For readers who want to understand the process at a deeper level, the chronology can be expanded.
A more detailed breakdown may look like this:
- Select the fabric.
- Initial fabric washing.
- Remove impurities.
- Prepare the fabric treatment.
- Apply traditional treatment.
- Dry the fabric.
- Prepare wooden blocks.
- Prepare printing materials.
- Prepare resist material.
- Apply the first print.
- Apply resist.
- Prepare the first dye bath.
- Dye the textile.
- Wash the textile.
- Dry the textile.
- Apply additional printing.
- Apply additional resist.
- Introduce additional dye colors.
- Wash and dry again.
- Complete final finishing.
- Inspect and prepare the textile for use.
This 21-step version should be understood as a detailed explanatory framework, because actual workshop practices can differ.
The important point is that Ajrakh’s complexity is created through repetition.
What Makes Ajrakh Block Printing Different?
Ajrakh is often described simply as hand block printing.
That description is technically useful but incomplete.
Ajrakh combines:
- Block printing.
- Resist printing.
- Natural dyeing.
- Repeated washing.
- Fabric preparation.
- Color layering.
- Geometric design.
- Hand alignment.
- Traditional knowledge.
This combination gives Ajrakh its distinctive character.
A digitally printed fabric can reproduce thousands of identical copies rapidly.
An Ajrakh artisan works through a slower relationship with material.
Every stage depends on the previous one.
That is why the finished textile carries evidence of the process itself.
The Human Skill Behind Every Repeated Motif
One of the most impressive parts of Ajrakh is the artisan’s ability to maintain repetition.
Imagine aligning the same carved block across a long piece of fabric.
Now imagine doing it:
- Without a digital screen.
- Without automated registration.
- Without a computer correcting alignment.
- Across multiple meters.
- Through several printing stages.
The result depends on experience.
An experienced artisan develops an instinct for:
- Pressure.
- Spacing.
- Alignment.
- Fabric movement.
- Color consistency.
- Block placement.
This is knowledge that grows through practice.
Why Natural Dyes Add More Time
Natural dyes are another important reason for Ajrakh’s slower production rhythm.
Natural color systems can require careful preparation and repeated treatment.
Indigo, for example, behaves differently from a ready-made industrial pigment.
The artisan needs to understand the dye bath and the interaction between the fabric and the color.
Natural dyeing can involve:
- Preparing dye materials.
- Maintaining the dye bath.
- Controlling the process.
- Repeated dipping.
- Oxidation.
- Washing.
- Drying.
- Checking the resulting shade.
This is not simply about getting “blue.”
It is about achieving the right blue.
Weather Is Part of the Process
Another hidden factor is the environment.
Traditional textile production often depends on natural drying.
This means:
- Sunny weather can help drying.
- Humidity can slow drying.
- Rain can interrupt outdoor work.
- Seasonal changes can affect workflow.
- Temperature can influence dyeing and drying conditions.
The artisan therefore works with the environment rather than completely controlling it.
This connection between craft and nature is one of the reasons traditional textile production feels so different from industrial manufacturing.
Why Handmade Imperfection Is Valuable
When people buy machine-printed textiles, they often expect perfect repetition.
Ajrakh offers a different idea of perfection.
A handmade textile may contain tiny variations.
One motif may not be absolutely identical to the next.
A color may have subtle tonal differences.
A small printing variation may appear.
These differences can be evidence of the handmade process.
They can tell us:
- A human hand made the textile.
- The block was physically handled.
- The dye developed naturally.
- The fabric moved through multiple stages.
- The artisan worked with real materials rather than digital pixels.
For many Ajrakh lovers, these variations are not flaws.
They are part of the textile’s personality.
From Workshop to Wardrobe
After weeks of preparation, printing, dyeing, washing and finishing, Ajrakh eventually reaches the person who will wear it.
That transition is important.
The textile begins as:
Cotton → Prepared fabric → Printed cloth → Dyed textile → Finished Ajrakh → Saree → Personal wardrobe
At the end of this journey, the craft becomes part of someone’s everyday life.
A saree may be worn at a celebration, a family gathering, a cultural event, or simply because the wearer loves the textile.
This is where heritage becomes personal.
Why Understanding the Process Changes How We Value Ajrakh
Once we know the chronology, the price of a handmade Ajrakh saree becomes easier to understand.
We are no longer paying only for meters of fabric.
We are also valuing:
- Artisan time.
- Block-carving skill.
- Dye knowledge.
- Printing expertise.
- Repeated washing.
- Natural materials.
- Design development.
- Cultural knowledge.
- Manual labor.
- Quality control.
The finished saree represents much more than its physical dimensions.
It represents a production story.
A Simple Way to Remember the Ajrakh Process
If the complete chronology feels complicated, remember this simple sequence:
Prepare
- Select the fabric.
- Wash it.
- Treat it.
- Dry it.
- Prepare the blocks.
- Prepare the printing materials.
- Print the design.
- Apply resist.
Dye
- Prepare the dye.
- Dye the fabric.
- Wash it.
- Dry it.
Build
- Print again.
- Add resist.
- Add more colors.
- Repeat the dyeing process.
Finish
- Wash.
- Dry.
- Inspect.
- Finish the textile.
This simple structure explains why Ajrakh cannot be rushed.
The Real Meaning of the 16-Step Journey
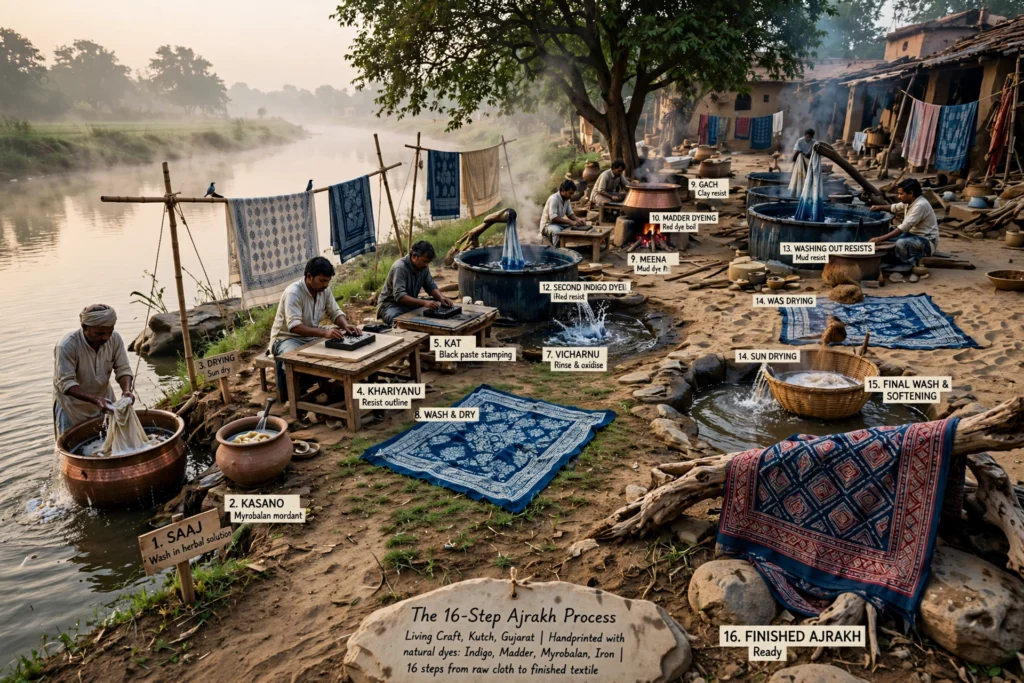
The 16-step Ajrakh process is not simply a production checklist.
It is a record of accumulated knowledge.
Every stage has a purpose.
The washing prepares the fabric.
The treatment prepares it for color.
The block creates the design.
The resist controls the dye.
The dye creates color.
The washing reveals the pattern.
The repeated printing builds complexity.
The final finishing brings everything together.
Remove one important stage and the final result can change.
That is the beauty of traditional craft: the finished object is inseparable from the process that created it.
Ajrakh Takes Time Because Time Is Part of the Craft
In a world where fashion can be designed, printed and shipped at extraordinary speed, Ajrakh offers a completely different rhythm.
It asks us to slow down.
A single saree may pass through numerous stages before it reaches the wearer.
The artisan does not simply print a pattern onto cloth.
They prepare the material, build the color, protect certain areas, repeat the design, wash away what is no longer needed, and gradually reveal the final textile.
That is why the question “Why does it take three weeks to make one Ajrakh saree?” has a deeper answer than simply listing the number of days.
It takes time because the craft is built through layers of human decisions, natural materials, repeated processes and careful waiting.
The 16-step framework gives us a clear way to understand the major stages.
The 21-step version allows us to look closer at the smaller operations within those stages.
Neither number captures every possible variation of Ajrakh production.
And perhaps that is the most important point.
Ajrakh is not a factory formula.
It is a living craft tradition.
Its process can vary from artisan to artisan, workshop to workshop and design to design.
But the heart of the process remains unchanged:
prepare the cloth, print with patience, resist the color, dye with care, wash, dry, repeat—and let the pattern slowly reveal itself.
By the time an Ajrakh saree reaches a wardrobe, it has already travelled through a remarkable journey of fabric, color, water, wood, earth, skill and time.
And that is what makes every authentic Ajrakh textile more than something beautiful to wear.
It is time, transformed into cloth.